Indoor Kick Scooter Training – Our Top 10 Strength and Balance Exercises
The best way to improve your scooting technique while stuck indoors is to focus on strength and balance. We've put together some of our favourite exercises to help you to keep your scooter muscles and joints active. It's never too late to work on improving muscle strength, balance and also to maintain and improve your flexibility. These easy exercises are great for those days when it's difficult to get outside, particularly if you are spending too much time sitting!
SHOP OUR RANGE OF PREMIUM ADULT KICK SCOOTERS
Keep Your Scooting Muscles Active
We all love the wind-in-the-hair feeling of a scoot outside, but you can work on your technique, balance and strength by way of some simple exercises if you're stuck at home. You can do these without any equipment!
You’ll no doubt feel the benefits when you get back out scooting, but it’s also great for your overall health and wellbeing.
Please make sure you warm up before attempting any of these, spend a few minutes doing some star-jumps and running on the spot before you start, to get your circulation going. We also recommend this Scooter Fitness warm-up from Alex Lawson, it only takes a minute.
Scooting is quite unique in benefitting a range of muscle groups that are otherwise hard to engage. Scooting is also great for fitness and heart health, without overly impacting joints. When you scoot you’re targeting the following groups –
- The Lower Body - quads, hamstrings, calves, and feet.
- Hips – glutes and hip flexors.
- Core, chest and back - improving posture and balance
- Smaller Interconnecting Muscles – from the truck muscles in your core to the small muscles in your feet, strengthening these provide stability.
To get better at scooting, you can strengthen these areas! Here are some of our favourite exercises to help you work out each area.
Lower Body Exercises Without Weights
Squats
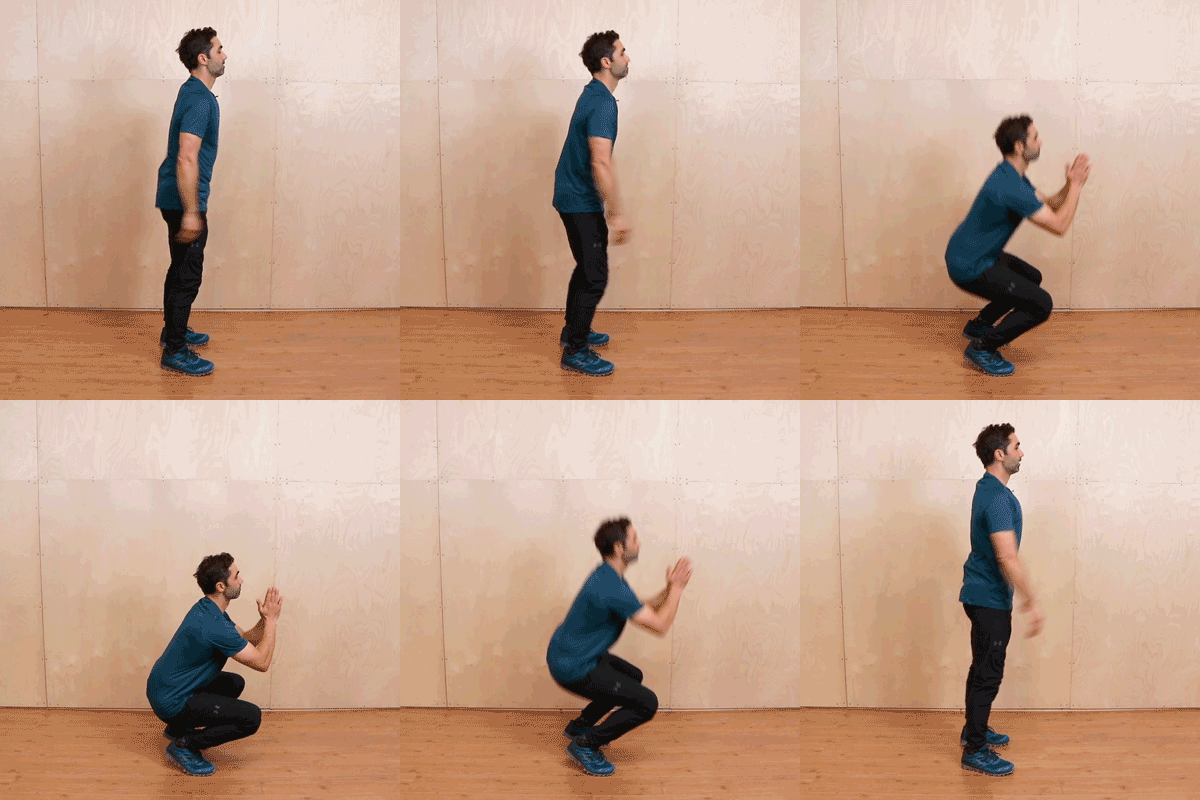
Squats are a classic, and great for building up lower body strength. A good squat will work your quadriceps and glutes not to mention help strengthen your hip joints your knee joints. A great one that's even suitable for small spaces!
Beginner: Standard Squat
Stand with your feet a bit more than shoulder-width apart, arms out in front of you parallel to the floor, and slowly lower yourself down like you’re about to sit on a chair and raise yourself back up to standing. Your knees should bend over your toes with your feet flat on the floor and with your head held high. It helps to focus on something in front of you. Try 3 sets of 10.
Advanced: Squat Jump 180
One way to push your squats to the next level is to turn them into squat jumps with a 180-degree turn. Do a regular squat down, then jump with a 180 degree turn, land and squat down again. Adding this jump helps to increase the strength in your legs by allowing the explosive action of jumping. In turn, this will also help your balance as you focus your landing and your foot strength (which we’ll explore more later).
Another way you can adapt your squat (as shown by Jason below) is the Hindu Squat. This is a type of squat where you lift your heels as you squat down. It's a great way of engaging your core and working on your balance while doing a squat.
Box Step Up
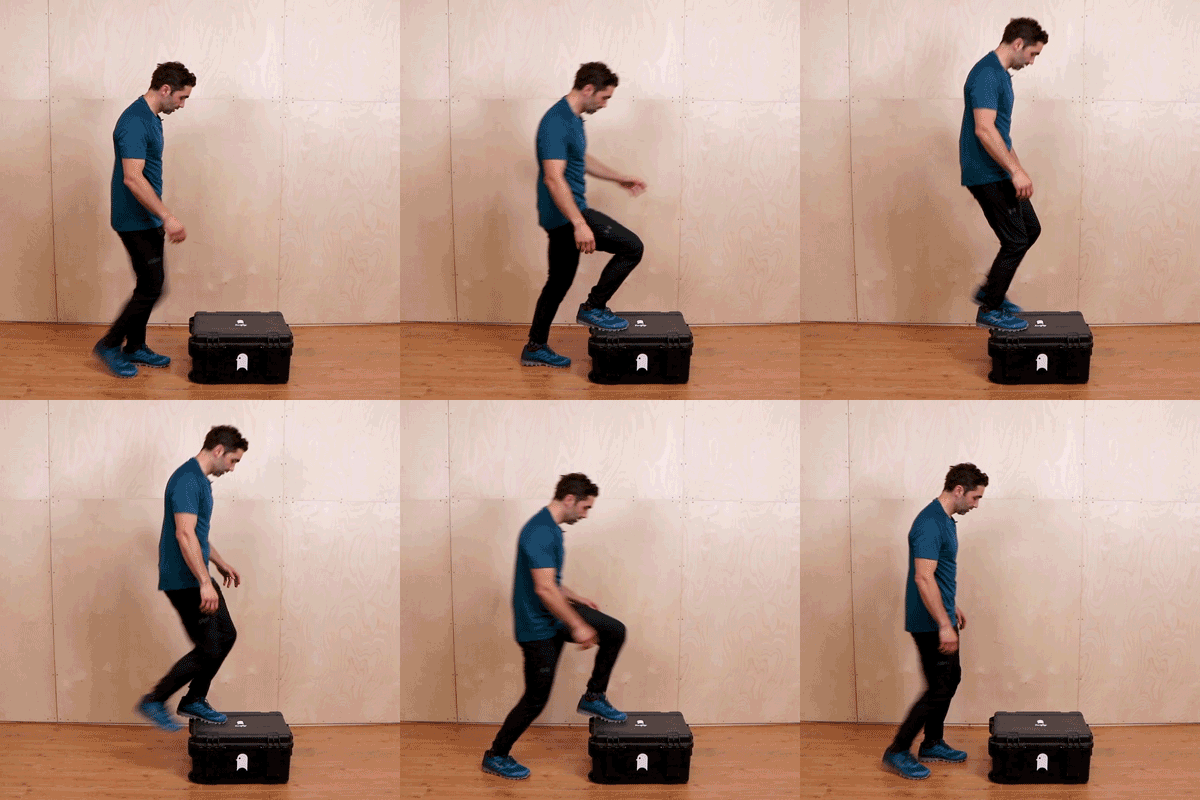
If squats aren’t your thing, you can find similar benefits by doing a box step up. This exercise is a great all-rounder for the lower body.
Beginner: Box Step Up
Find a platform in your house, it could be the stairs or sofa, or a garden bench. Simply place one foot on the platform, transfer your weight from one foot to the other, and step down. Do this for 30 seconds and repeat with the other foot first.
Again, you can easily make this more challenging by holding onto some extra weight while doing this. You can also adapt this to be done as lateral step-ups, step-overs, or dynamic step-ups with a knee lift.
Advanced: Box Jumps
You can switch this into a jumping action to really feel the benefits too! Jump with both feet onto a box, then step down. Switching to a jump really increases the intensity of the exercise, making it into a HIIT workout!
Reverse Lunges
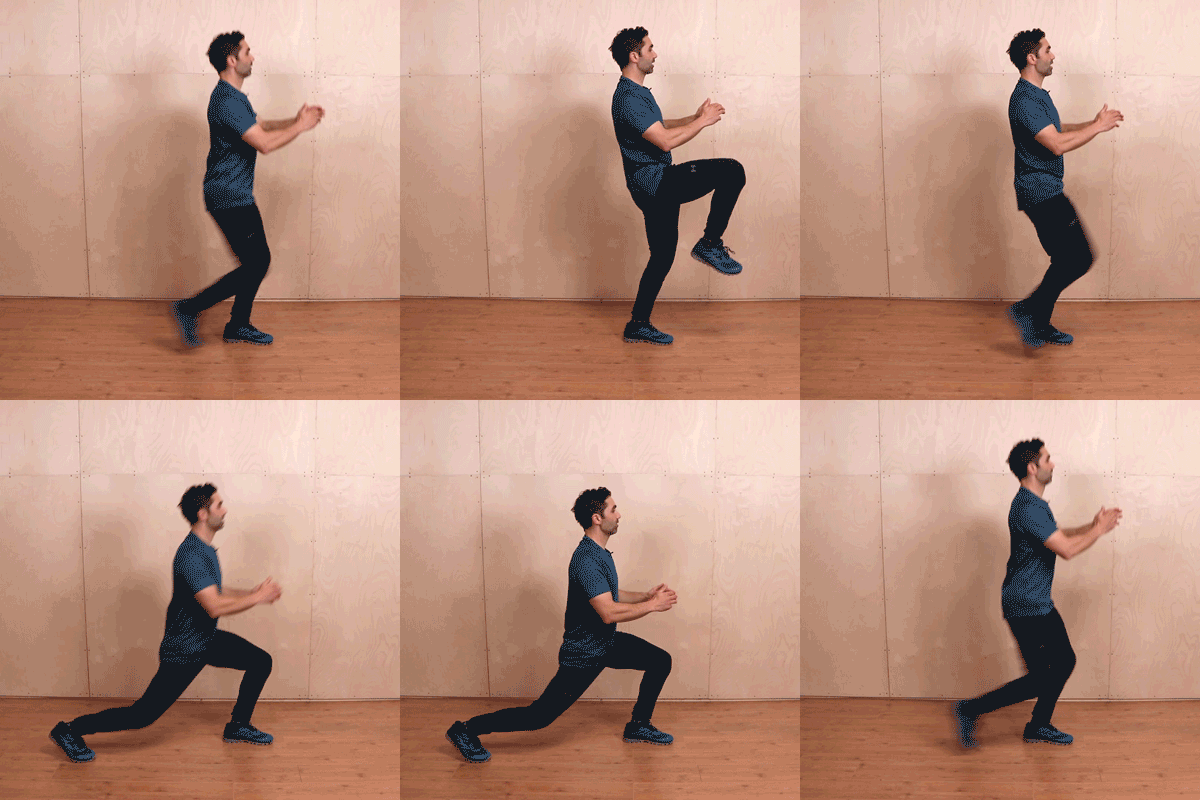
Lunges are another standard exercise many of us will already know, and their benefits are plentiful. Reverse lunges are just what the name would imply, and it’s one of the best exercises you can do to emulate the action of scooting! They tick all the boxes we want to for our scooter work out – great for the lower body, your mobility as a whole, and your balance!
Beginner: Reverse Lunge
To do a good reverse lunge keep your upper body upright with your shoulders back and chin up. Take a step backwards and lower your hips until both knees are roughly 90-degrees. Make sure your front knee is directly above your ankle, with a nice 90-degree angle, and make sure your other knee doesn't touch the floor. Keep your front foot flat on the floor and return to the standing position. Try 3 sets of 10, alternating legs.
Advanced: Lunge Jumps
Once in the lunge position, jump up and switch legs and land with the other foot forwards. Jump up again and land in the lunge position. These are great for HIIT scooter training and great for balance training and even to help with your 'switch-kick' scooter technique! Tip: try marking the floor with tape or chalk to focus on your landing.
Once again, there are tons of different types of lunges. Here, Jason has included a knee lift in his single leg reverse lunge. I love this one! Try 10 reps on each side and repeat 3 times, keeping it nice and slow and controlled.
Hip Flexor Strengthening Exercises
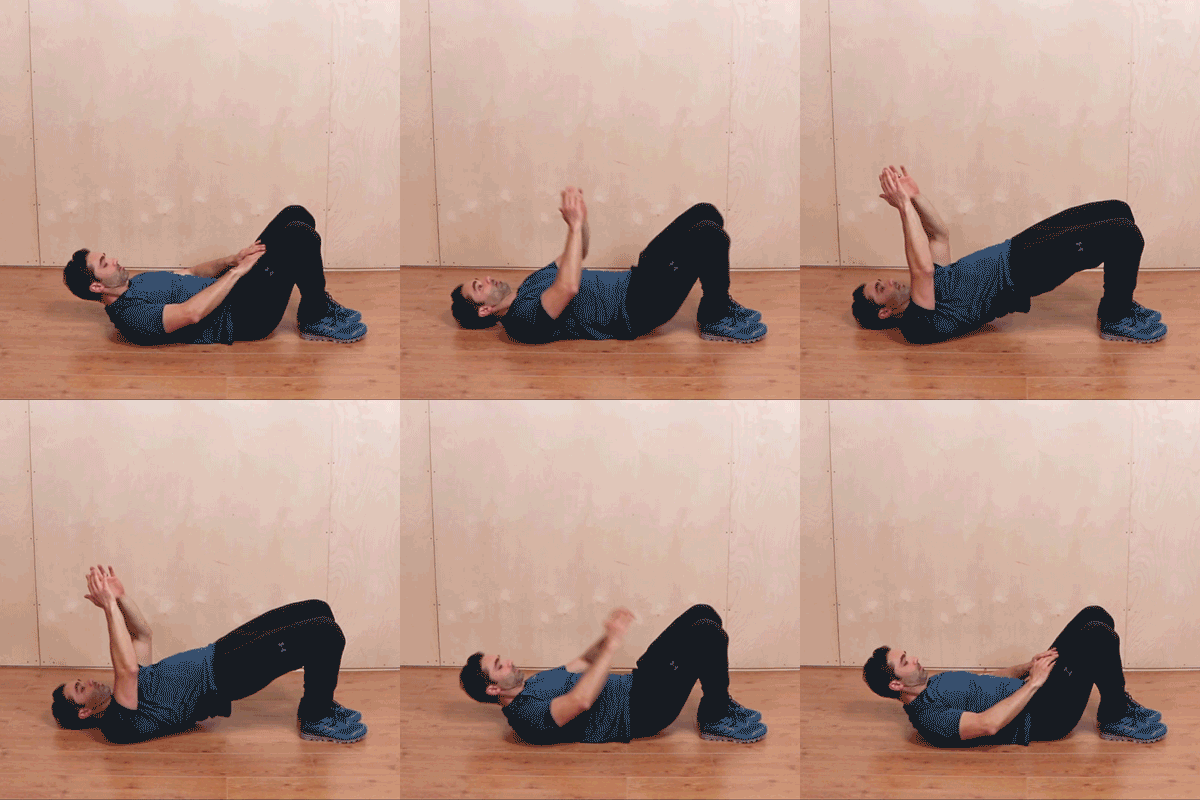
Bridges
The Hip Bridge is an easy floor exercise for the hips and lower back. To do a good hip bridge exercise, lie down with your knees bent, feet flat and arms at your side. Push into your heels so you lift your hips up off the floor and squeeze your glutes. Hold for a few seconds and lower yourself down, and repeat roughly 10 times. Here, Jason had included a crunch to gently work the abdominals.
Core, Chest, Back Exercises
Plank
Yes, the dreaded plank. Though known and loathed by many, you can’t deny the benefits a good plank has on your core.
Beginner: Raised Plank
A standard plank is balancing on your toes and forearms, with your body tensed and flat. To make it a bit easier on yourself to start with, try a raised plank (with straight arms) or even plank at 45-degrees against the kitchen while making a cup of tea!
Start by planking for 10 secs on and 10 secs resting, develop that to just 5 secs resting until you can hold it for as long as you can. 60 seconds is a good target! Do around 3-6 sets of this based on how comfortable you are with it.
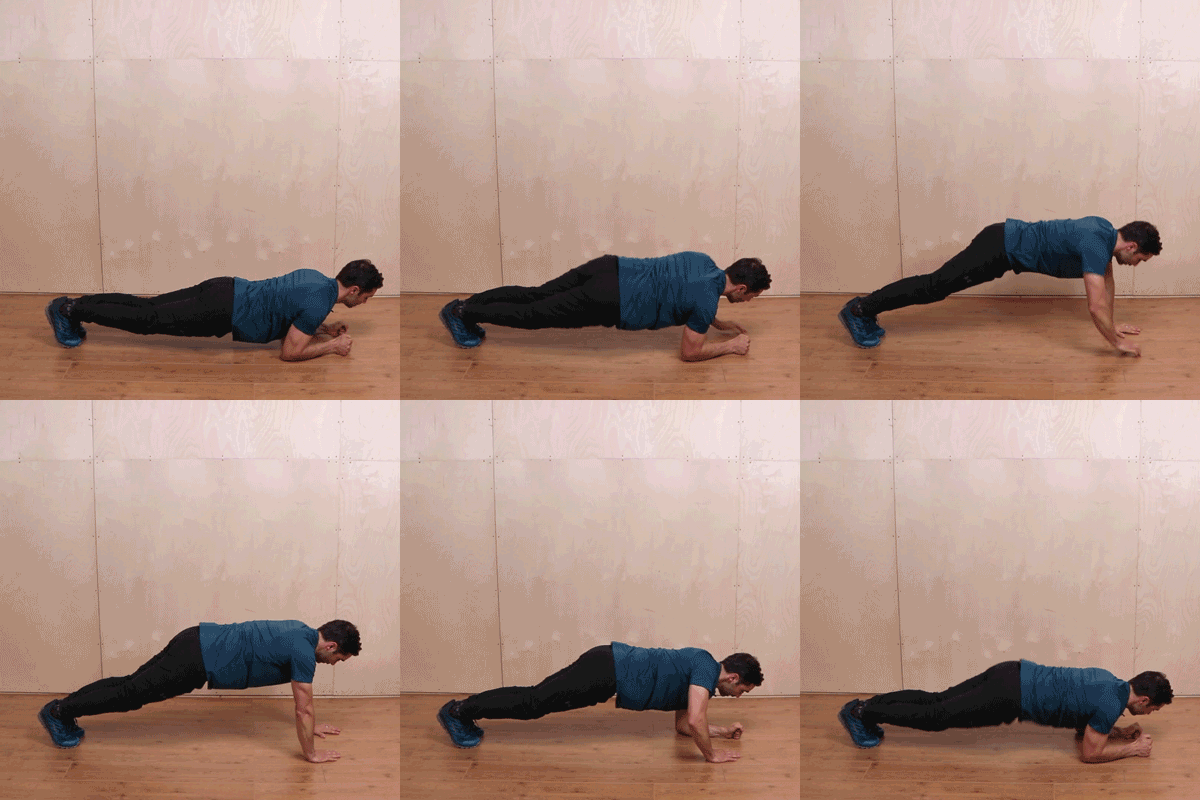
Advanced: Plank Walk
One way you can make this more intense, as Jason demonstrates below, is to do a Plank Walk. This involves you starting in the regular plank position, pushing yourself up to be in a press-up position and lowering yourself back down into a plank. It's a great way of working your full body and testing your core strength.
Hands-elevated press-up
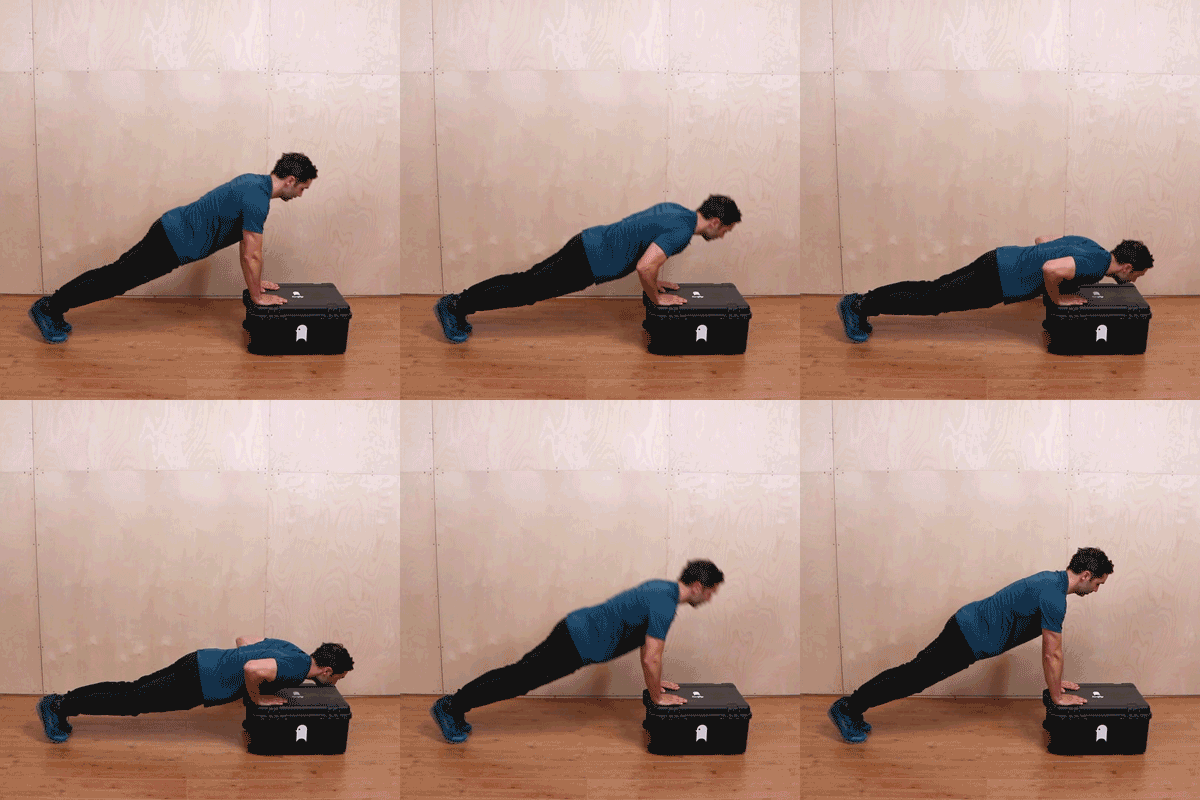
Press-ups are a normal go-to in a workout, but also come with their own stigma. Instead of diving in at the deep end with a normal press up, hand elevated press ups give us the opportunity to build up our strength.
Start with your hands on the wall and stood a little more than arm's length back. Slowly bend your elbows so you’re leaning into the wall, hold for a second and push back slowly. Repeat this around 10-15 times.
As your confidence grows you can gradually make it tougher for yourself and have your hands lower. You can move on to doing it on the kitchen counter, sofa, or table. It’s easily adjustable to your level, only do what’s comfortable!
Floor Swimming
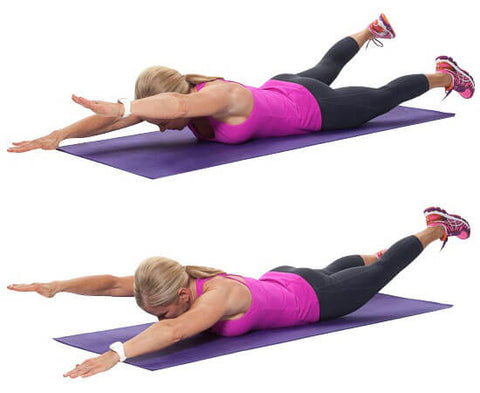
This might be a bit more unusual exercise for a lot of us, but is a great way to stretch and strengthen your back.
Lie face down, arms and legs outstretched, then slowly lift your left arm and right leg. Hold that for a few seconds, lower them and repeat with your right arm and left leg. You can also do this with both arms and both legs. Aim to do both around 5-10 times making sure to do them slowly and comfortably.
These are just a few of our favourite exercises that will improve your strength and balance. Please don't forget to cool down with a few stretches. Here's Alex Lawson with our 3 minute scooter cool-down!
When you finally get back on your scooter you’ll feel unstoppable!
Not a runner? Learn the benefits of taking to your adult scooter for high-intensity low impact cardio HERE
Have a Go At Exercises To Improve Balance
Balance is an often overlooked part of a workout but is something that is crucial, especially as we get older. Scooting helps our balance, and likewise improving balance through some easy exercises at home can improve our scooting form!
Stretching can be quite off-putting to a lot of people and frustrating when you first start as it can sometimes involve you being in positions that are initially uncomfortable for you. As with everything mentioned in this blog, it’s important to start off with the basics and build it up from there once you get more confident.
For most of us, balance exercises couldn't be simpler. The standard exercises we can all get involved with don’t need any special equipment, just a bit of space!
Exercises that involve standing on one leg are a great way to work on your balance. We all have a dominant leg, so it’s a good idea to test ourselves to be equally comfortable on the other leg. You can bring your less dominant side up to par with your stronger side through training, and reconnecting the neural pathways on your weaker side.
Our top exercises to improve your balance are variations on the exercises mentioned above but with a little twist to really put your balance to the test!
Slow Squat With Knee Lift Hold
A standard squat is great for your balance, but the addition of a knee lift hold is the perfect way to push it a step further!
Start with a regular squat. Once you’re at the lowest position, shift your weight onto the left leg and lift the right knee. Hold for a couple of seconds, bend back down to the squat position, transfer your weight to the right leg, and left the left knee. Keep the movement slow and controlled for 30 seconds, and repeat.
No doubt a challenge, but one that will be really testing your balance, coordination and foot strength, and therefore doing you the world of good with just a few reps!
Compass Lunges
This type of lunge is great for both your foot and ankle and is a good step up from the standard reverse lunge mentioned earlier. The idea is to complete a lunge that hits every point on the compass. Instead of a regular forward lunge, you’ll be mixing in lateral lunges and angular lunges and our favourite the reverse lunge!
Start with your right leg and a normal forward lunge (North), your next lunge will be at 45 degrees (North-East), the next a sideways lunge (East) and so on to a reverse lunge (South). Then do the same on the left leg and ‘West’.
This is a great way to build strength and confidence that your ankle will have a full range of movement and gets you testing your balance very evenly. To make it harder, take a bigger step. Again keep the movement slow and controlled.
If you want to have a go on your scooter you could really test your balance by trying to do a ‘track stand’ on a scooter. This involves being stationary (brakes on!) and trying to stay upright on just your wheels for as long as possible. It’s no doubt a challenge, but it’s also a bit of fun. Do this one with a partner or challenge members of your family!
The beauty of balance exercises is that they can be done by anyone and the effects will be so beneficial. However, if you’re already confident in your balance, then challenge yourself by making the movements really slow and controlled!
We hope this gives you a few things to keep your mind occupied while we’re stuck inside. Inside time, doesn’t have to be downtime! And, the more we master these aspects now, the more we’ll be ready to hit the streets once this is all over!

